


Let’s learn all about database initialization in spring boot. We can create and populate a database in different ways. Even though it is common to do this manually, an automatic approach is not a bad thing.
For example, Spring Boot offers Schema and Data initialization through the JPA module. We can control this behavior using the following properties.
- spring.jpa.generate-ddl – This configuration takes a boolean value to either enable or disable schema initialization.
- spring.jpa.hibernate.ddl-auto – This property takes an enum that controls the schema generation in a more controlled way.
The main difference between these two options is that the first one is vendor agnostic. As you know, Spring JPA uses hibernate as its vendor. But with enough configuration, you could use other vendors like eclipse-link, OpenJPA, DataNucleus, etc. In such cases, Spring Boot will choose an appropriate initialization mode based on the vendor.
As Spring Boot uses hibernate as its official JPA you have better control over how you initialize data with the second approach. Let’s go deep on the options with some examples. We will come back to the first option at the end of the article.
Database Schema initialization through Hibernate
If you haven’t noticed already, The configuration name says it all. It is a Spring JPA-related property which is specific to the hibernate vendor. And it has something to do with DDL.
The spring.jpa.hibernate.ddl-auto takes one of none, validate, update, create, and create-drop. By explicitly specifying one of these options, you are instructing Spring Boot on how to initialize the schema.
| Option | Effect |
|---|---|
| none | No database Schema initialization |
| create | Drops and creates the schema at the application startup. With this option, all your data will be gone on each startup. |
| create-drop | Creates schema at the startup and destroys the schema on context closure. Useful for unit tests. |
| validate | Only checks if the Schema matches the Entities. If the schema doesn’t match, then the application startup will fail. Makes no changes to the database. |
| update | Updates the schema only if necessary. For example, If a new field was added in an entity, then it will simply alter the table for a new column without destroying the data. |
Let’s see these options in action. I have created two entities as shown here.
public class Address {
    @Id
    @GeneratedValue(strategy = GenerationType.IDENTITY)
    private Integer id;
    private String line1;
    private String line2;
    private String city;
    private String state;
    private String zipCode;

 //getters & setters
}Code language: Java (java)
@Entity
public class Employee {
@Id
@GeneratedValue(strategy = GenerationType.IDENTITY)
private Integer id;
private String firstName;
private String lastName;
private String department;
@ManyToOne
private Employee manager;
@ManyToOne
private Address address;
//getters & setters
}Code language: Java (java)Create and Create-Drop options
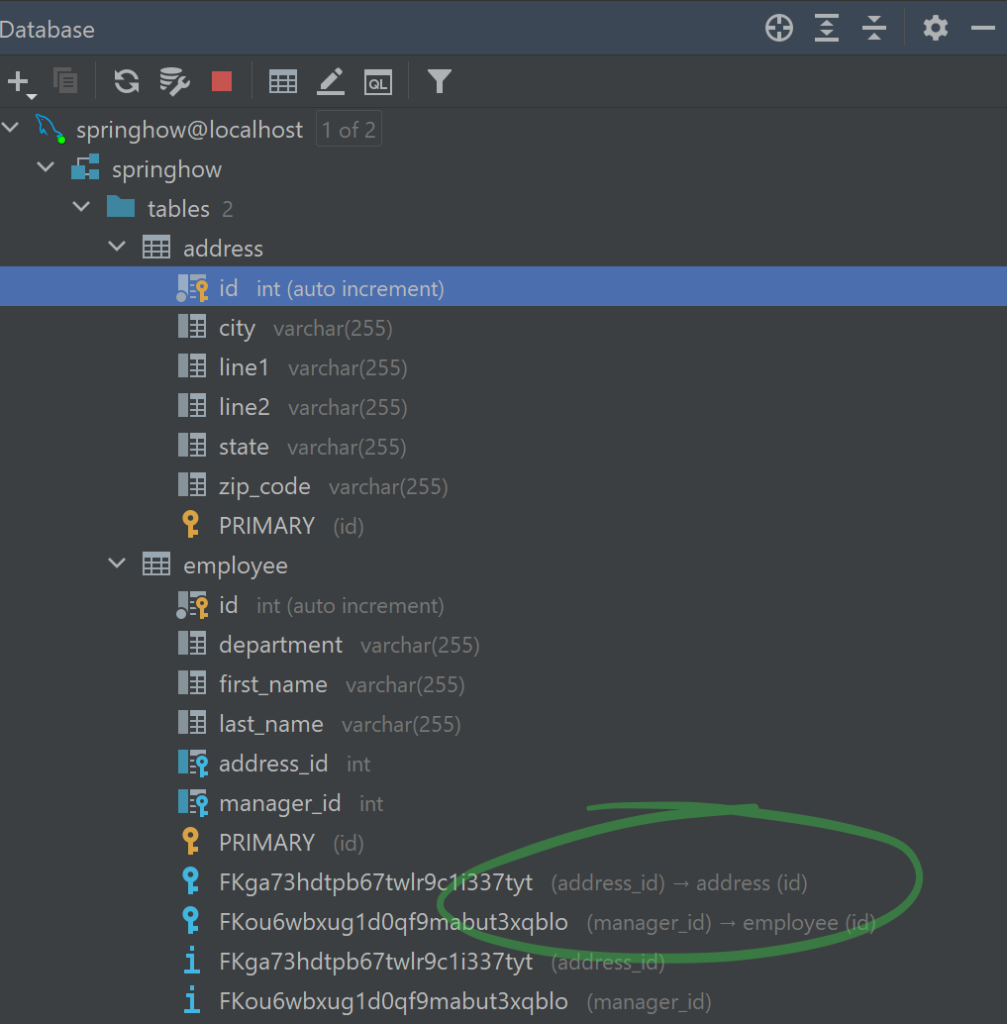
With the above entities in place, let’s set the spring.jpa.hibernate.ddl-auto to create. Once the application starts, you can see the database initialization created two new tables with proper foreign key mapping.

Also, by enabling debug logs (debug=true), you can see the DDL statements of Hibernate in logs.


Note that the spring boot application drops and re-creates the table in the database. The “create-drop” option works the same way. One difference is that the schema will be destroyed at a graceful shutdown.
Note that the default value database initialization in Spring Boot for embedded databases is create-drop.
Validate and Update options
To test these options let’s introduce a new column to one of the entities. For example, I am adding an email column to the Employee entity that takes unique values. If we set the ddl_auto to “validate” you will get a SchemaManagementException.
Caused by: org.hibernate.tool.schema.spi.SchemaManagementException: Schema-validation: missing column [email] in table [employee]
	at org.hibernate.tool.schema.internal.AbstractSchemaValidator.validateTable(AbstractSchemaValidator.java:136) ~[hibernate-core-5.4.32.Final.jar:5.4.32.Final]
	at org.hibernate.tool.schema.internal.GroupedSchemaValidatorImpl.validateTables(GroupedSchemaValidatorImpl.java:42) ~[hibernate-core-5.4.32.Final.jar:5.4.32.Final]
	at org.hibernate.tool.schema.internal.AbstractSchemaValidator.performValidation(AbstractSchemaValidator.java:89) ~[hibernate-core-5.4.32.Final.jar:5.4.32.Final]
	at org.hibernate.tool.schema.internal.AbstractSchemaValidator.doValidation(AbstractSchemaValidator.java:68) ~[hibernate-core-5.4.32.Final.jar:5.4.32.Final]
	... 20 common frames omittedCode language: CSS (css)
This behavior is expected as the schema doesn’t have this column yet. Without this column, your application would end up having errors anyway.
Let’s change the setting to “update” and see what happens.


As you see, the application doesn’t create the entire employee table. Instead, it simply adds the email column and creates a unique index as we defined. This database initialization features from Spring Boot and hibernate are very helpful. Especially in the earlier time of development.
Note that if you remove a column definition from entity, then the “update” option will not drop that column in the database.
Setting database intialization to “none”
As the name suggests, this option stops hibernate from generating or validating the schema in the database. This option is crucial for production setups where you don’t want to generate schema accidentally.
Importing Data into newly initialized schema via Hibernate
All the options that we saw above are hibernate’s features. That is why even in logs you can see loggers of Hibernate(org.hibernate.SQL). Along with this schema initialization, hibernate also provides data initialization through an import.sql file. This way you can load some initial data or test data as you deem fit.
Note that this approach only works with hibernate and with the ddl-auto set to create or create-drop. As you would need a clean slate to import the data, it makes sense why you can only do import with these options.
Here is an import.sql that populates the employee table.
insert into employee(id, first_name, last_name, email, department) values (1, 'John', 'Doe', 'JDoe@example.com', 'Sales');
insert into employee(id, first_name, last_name, email, department, manager_id) values (2, 'Jane', 'Dee', 'JaDee@example.com', 'Finance', 1);
Code language: SQL (Structured Query Language) (sql)
By default, hibernate looks for this file in your classpath root. So you should ideally put this file under src/main/resources/ or src/test/resources depending on the use case. You can also configure hibernate to load this file from a different location. But that topic is out of this article’s scope. However, You can get the necessary information from hibernate documentation.
So what’s with spring.jpa.generate-ddl?
As we discussed earlier, the spring.jpa.generate-ddl is a single switch that is applicable to hibernate or any other JPA vendor. If this is set to true, Spring Boot will ask the respective JPA vendor to initialize the database based on the entity definition.
What this option does mainly, is that it abstracts away the complex decisions. Complex decisions that could easily mess up a setup if not done correctly. For instance, you would always want the embedded databases to have a schema. But you would not want an automatic schema initialization when you are deploying the application to production. For this reason, Spring boot keeps a single flag that can detect types of databases and act accordingly.
But bear in mind that the spring.jpa.generate-ddl will be ignored if you have a config for spring.jpa.hibernate.ddl-auto. This is because the second config is more fine-grained and thus overriding the first one.
Advantages of Spring Boot Database Initialization
There are few important advantages for which you should use Spring Boot’s database schema initialization feature.
- It reduces manual work of creating DDL for each tables and columns.
- Quick local developement setup time. No need to run long scripts manually.
- You can progressively update schema through the update option.
- The hibernate’s “validate” option can identify missing schema items before application is ready. Saving lot of production headaches.
- The import.sql can setup test data without having to set it up every time.
- JUnit + embedded databases solve complex test case setups.
- As JPA takes care of the schema generation, The JPA vendor(hibernate) will always pick the right dialect for the DDL commands. This way you don’t have to worry about initialization scripts while moving to a different Database product.
Related
If you want to try these configurations, I have this demo project at our GitHub repository.