Docker setup for MySQL and phpMyAdmin
In this post, we will take a look at how to set up a MySQL database and phpMyAdmin in a local machine using docker for application development. After completing this tutorial, you will know how to run the MySQL database locally.
Background
Let’s face it. The hardest part of the development is setting up the local setup. Especially when it involves maintaining a database locally means it is a headache. Even though many databases like MySQL provide simple installers for this purpose, It is still your job to maintain that database. And most importantly, you need to uninstall it when you don’t need it anymore.
But with technologies like VirtualBox, Vagrant, and especially Docker, you could startup your local setup way faster.
Before we start
There are some pre-requisites for this tutorial. They are,
- A little understanding about containers/images and docker in general
- Have Docker Desktop installed on Your machine. You can find the installers at https://docs.docker.com/desktop/.
- Able to run commands in CMD or BASH
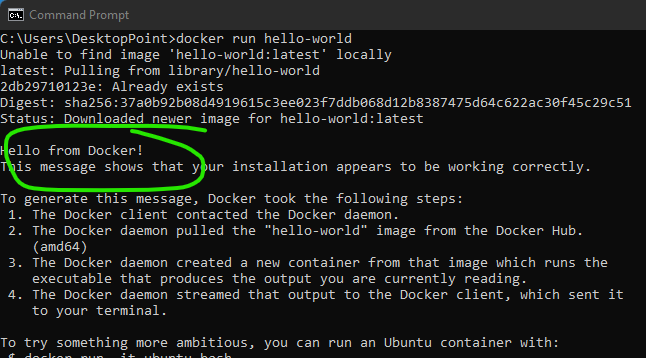
Once you have installed the docker for desktop in your windows/Linux/Mac machine, make sure to test the installation by running the following command.
docker run hello-worldThe command should print something like this.
Starting MySQL container in local using Command Line
Each MySQL database version is available as a docker container at https://hub.docker.com/_/mysql. At the time of writing, MySQL 8 is the current release so we will choose to install that in our local for this example.
Docker can run an image as the current process (Like we saw in the hello-world image above) or it can run them in the background. As we would want the database to be run as a separate process, the easier and simpler option to run a MySQL instance is by calling the following command.
docker run --name mysql8 -e MYSQL_ROOT_PASSWORD=root -e MYSQL_DATABASE=test -e MYSQL_USER=test -e MYSQL_PASSWORD=test -d mysql:8 -p "3306:3306"Code language: JavaScript (javascript)This command creates a docker container running MySQL version 8 in the background. Once you run this, you would get a long string of characters. This value is the reference for the container that we just now created.

At this point, you could point your application or a database client to make changes to the database running on a local machine via docker. For example, the following properties for a spring boot application work just fine.
spring.datasource.url=jdbc:mysql://localhost:3306/test?useSSL=false&allowPublicKeyRetrieval=true
spring.datasource.username=test
spring.datasource.password=testCode language: JavaScript (javascript)
But after you are done with the application, you can stop the container by name using the following command.
docker stop mysql8 Also, there are other options for this image that lets you keep the data after the container stops and even you can provide a custom my.cnf file to further configure your container. But I will leave that part to you.
Using Docker Compose for MySQL and phpMyAdmin
Even though the above approach is more than enough, the long commands and various options are hard to remember and keep track of. This is where docker-compose comes into play.
With Docker Compose, you can create a single descriptor file for one or more containers in a controlled way. For example, we can rewrite our previous example as the following docker-compose.yml.
version: '3'
services:
  mysql8:
    image: mysql:8
    ports:
      - "3306:3306"
    environment:
      MYSQL_ROOT_PASSWORD: "root"
      MYSQL_DATABASE: "test"
      MYSQL_USER: "test"
      MYSQL_PASSWORD: "test"Code language: JavaScript (javascript)
With this file, you can simply start or stop the docker containers with the following commands.
docker-compose up -f docker-compose.yml -dCode language: CSS (css)docker-compose down -f docker-compose.ymlCode language: CSS (css)While the advantage here seems to be simple startup/shutdown commands, the real advantage is how docker-compose allows multiple containers to start together.
For example, you can start a PHPMyAdmin along with the database to manage the tables and schema.
version: '3'
services:
mysql8:
image: mysql:8
ports:
- "3306:3306"
environment:
MYSQL_ROOT_PASSWORD: "root"
MYSQL_DATABASE: "test"
MYSQL_USER: "test"
MYSQL_PASSWORD: "test"
phpmyadmin:
image: phpmyadmin/phpmyadmin
ports:
- "8081:80"
environment:
PMA_HOST: "mysql8"
MYSQL_ROOT_PASSWORD: "root"
MYSQL_DATABASE: "test"
MYSQL_USER: "test"
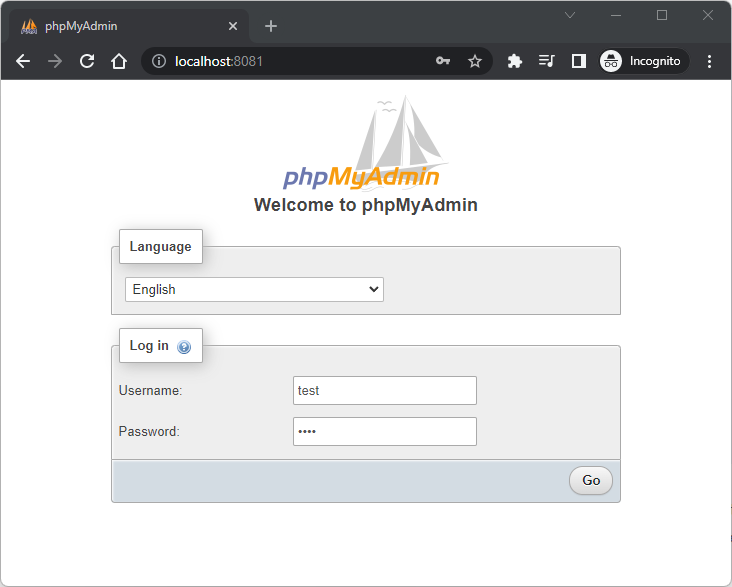
MYSQL_PASSWORD: "test"Code language: JavaScript (javascript) With this file, the docker-compose up -f docker-compose.yml -d will result in two containers. One for the MySQL and another for the PHPMyAdmin. You can even visit http://localhost:8081 to manage the tables and schema.
Summary
We learned how to create a docker container for MySQL database in a local development environment. We also saw, how we can make use of docker-compose.yml to start MySQL container locally with ease.