Spring Boot Redis Cache Example
Let’s learn how to implement Redis as a cache store in spring boot with an example.
Previously, We discussed how to enable caching implementation in Spring Boot using an in-memory cache manager. But, there were a few drawbacks to that approach. This is where the Redis cache store comes into the picture.
Introduction
Redis is a high-performance datastore with high read/write throughput. This is why it is a perfect candidate for storing cache and session information.
Setup Local Server for Redis
If you already have a Redis server setup or you are familiar with these steps, you can skip to Adding Redis Dependencies.
The best way to set up a Redis server in the local machine is to use docker. In this case, I’m using Redis along with Redis-commander GUI for Redis.
version: '3'
services:
  redis:
    container_name: redis
    hostname: redis
    image: redis
    ports:
      - "6379:6379"
  redis-commander:
    container_name: redis-commander
    hostname: redis-commander
    image: rediscommander/redis-commander:latest
    restart: always
    environment:
      - REDIS_HOSTS=local:redis:6379
    ports:
      - "8081:8081"Code language: JavaScript (javascript)
The above step is only for testing things locally. For production, please follow official Redis documentation for the server installation.
Run the following command for starting the containers.
docker-compose docker-compose.yml up -dCode language: CSS (css)Once the docker container is up, You can view Redis commander at http://localhost:8081.

Add redis dependencies
Like always, Spring boot makes things easier with the help of sophisticated starter dependencies. All you have to do is to add the Redis starter.
<dependency>
    <groupId>org.springframework.boot</groupId>
    <artifactId>spring-boot-starter-data-redis</artifactId>
</dependency>Code language: HTML, XML (xml)
Add appropriate settings for the Redis configuration. You can skip the following if you are using Redis locally.
spring.redis.host=localhost
spring.redis.port=6379Code language: Properties (properties)
In production you may need to add spring.redis.username and spring.redis.password based on your server.
Enable Caching
To enable caching support in Spring boot, first, you need to annotate the main class with @EnableCaching.
@EnableCaching
@SpringBootApplication
public class SpringBootRedisCacheExampleApplication {

    public static void main(String[] args) {
        SpringApplication.run(SpringBootRedisCacheExampleApplication.class, args);
    }
}Code language: Java (java)
Add @Cacheable annotation
Find a long-running method and annotate it with @Cacheable. This annotation takes a value which is the cache name. And the key is a unique object to look up the value in cache later.
@Cacheable(value = "items", key = "#id")
public Item getItem(Integer id) {
    Item item = itemRepository.findById(id).orElseThrow(RuntimeException::new);
    logger.info("Loading data from DB {}", item);
    return item;
}Code language: Java (java)
In this case, We used Spring Expression Language(SpEL) to pass the argument value as key.
Add @CacheEvict annotation
Once cached, The values stay there indefinitely. Thus, the cache abstraction will never pick updated values from the database. For this reason, you should use @CacheEvict on updates.
@CacheEvict(value = "items", key = "#id")
public Item updateItem(Integer id, Item request) {
    Item item = getItem(id);
    item.setPrice(request.getPrice());
    item.setProductName(request.getProductName());
    return itemRepository.save(item);
}Code language: Java (java)
See Redis in Action
Once we start the application, The first request goes to the database. And the subsequent requests fetch data from the Redis cache-store. We know this because,
- The logs says the records is from the database.
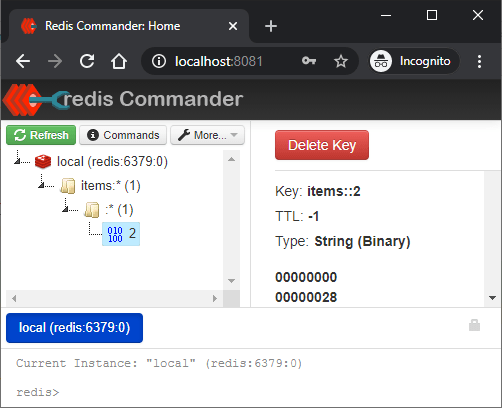
c.s.e.s.cache.service.ItemService:Loading data from DB Item{id=2,productName='Pants Large',price=21.99}Code language: Java (java)- When we open redis-commander, we can see that
itemscache containing entry with key2.These cached value is in the form of binary.
What about the cache evict? Let’s try updating item 2.
curl -X PUT \
  http://localhost:8080/items/2 \
  -H 'cache-control: no-cache' \
  -H 'content-type: application/json' \
  -d '{
    "productName": "Pants Large",
    "price": 14.99
}'
HTTP/1.1 200
Content-Type: application/json
Transfer-Encoding: chunked
Date: Sun, 13 Dec 2020 18:11:16 GMT

{"id":2,"productName":"Pants Large","price":14.99} Code language: Bash (bash)
As you see the cached value for key 2 is now gone. The next time a getItem call happens, the values will be cached again.
Caching between multiple application instances
As Redis server runs outside the application, multiple application instances can share the same cache-store. For example, Let’s run the same application again on different port 7070 (using —server.port=7070).
java -jar redis-demo.jar --server.port=7070Code language: Bash (bash)We can confirm that the second instance had successfully connected to the redis server by various means.
- By checking logs. There should not be any error when RedisAutoConfiguration takes place.
- By checking the client connections on the server. Click the
local (redis:6379:0)element at the side nav of redis-commander, and it will give the server stats. In the results, find the value forConnected clients. The value should be 3. This is due to 2 connections from the application and 1 connection from the redis-commander itself.
Let’s call the API from application running on port 8080.
curl -X GET http://localhost:8080/items/2Code language: Bash (bash)This creates a cache entry in redis. Now try hitting server on 7070 for the same resource.
curl -X GET http://localhost:7070/items/2Code language: Bash (bash)The response is immediate and there is no logs that says the record is from the database.
Timeout for cached values
You can also specify how long the value can live in the cache store.
spring.cache.redis.time-to-live=5mCode language: Access log (accesslog)The above configuration will automatically evict any cached entry after 5 minutes.
Summary
To summarize, We learned how to use redis data store as cache for spring boot application. The code and the docker-compose.yml for this example is available in this github repository.
Also, if you like this article, You may find the following write-ups helpful.
Hi Sir,
I want to learn redis cache with springboot in detail. Can you teach me over the zoom.
I ready to pay your charges for that.
Thank you for these practically-useful articles.
May I suggest that you include a README.md file in your GitHub repositories pointing back to the articles covering the particular project. Apart from being obviously useful, it will also increase the weight that search engines give your pages, being pointed to as it were, by the high-ranking site that GitHub is..