Connection to a database from Spring Boot
Spring Boot lets you make connections to a database of any type with little to no configuration. In this post, we will see how to connect to a MySQL database with spring boot.
Step 1: Add a database starter
In spring boot, a starter is a special type of dependency that comes with some auto-configuration. In our cases, two primary spring boot starters let you make a connection to a database.
<dependency>
    <groupId>org.springframework.boot</groupId>
    <artifactId>spring-boot-starter-data-jdbc</artifactId>
</dependency>Code language: HTML, XML (xml)
or
<dependency>
    <groupId>org.springframework.boot</groupId>
    <artifactId>spring-boot-starter-data-jpa</artifactId>
</dependency>Code language: HTML, XML (xml)
Either of these starters will auto-configure a database for you. However, the spring-boot-starter-data-jdbc provides only a jdbcTemplate to access a database through plain old SQL. While spring-boot-starter-data-jpa allows you to access databases through repositories using JPQL.
Step 2: Add the appropriate database JDBC driver
The next step is to add a database driver matching the database that you want to connect. For example, the below snippets will let you add JDBC drivers for MySQL, Oracle, and PostgreSQL.
<dependency>
  <groupId>mysql</groupId>
  <artifactId>mysql-connector-java</artifactId>
  <scope>runtime</scope>
</dependency>Code language: HTML, XML (xml)
or
<dependency>
  <groupId>com.oracle.database.jdbc</groupId>
  <artifactId>ojdbc8</artifactId>
  <scope>runtime</scope>
</dependency>Code language: HTML, XML (xml)
or
<dependency>
  <groupId>org.postgresql</groupId>
  <artifactId>postgresql</artifactId>
  <scope>runtime</scope>
</dependency>Code language: HTML, XML (xml)
Note that we haven’t mentioned any versions in these dependencies. Because spring boot already maintains all dependency versions in their bill of material(BOM). If you want to, you can override these versions by defining maven properties like “mysql.version”, “postgresql.version”, “ojdbc.version” etc. For example, to override the MySQL version, you should use something like the below in your pom.xml.
<properties>
    <mysql.version>8.0.26</mysql.version>
</properties>Code language: HTML, XML (xml)
Step 3: Setup database connection properties
The next step is to configure our spring boot application connections to the database. For this, you need to define a set of spring.datasource.* properties. The most important ones are the URL, username, and password. Without these, an application cannot make a JDBC connection.
For example, here are the connections for a MySQL database.
spring.datasource.url=jdbc:mysql://localhost:test
spring.datasource.username=springhow
spring.datasource.password=SecurePassword@123Code language: Properties (properties)
All these properties help create a Datasource connection pool for our spring boot application. So whenever the application needs to access the database, it can use dataSource.getConnection() to get a new connection. This way we can reuse connections and will not exhaust the database.
Furthermore, We can set the number of active connections, idle connections, timeout values, etc through the application properties.
spring.datasource.hikari.maximum-pool-size=100<br>spring.datasource.hikari.minimum-idle=10Code language: Properties (properties)Note that the properties are using “hikari”. This is because spring boot by default uses Hikari connection pooling. You can however switch this to tomcat, dbcp2, oracleucp for connection pooling implementation.
Step 4: Testing if Spring Boot connection to the database
The easiest way to test the database connection from Spring boot is to start the application and by checking to debug logs. So let’s start the application with debug mode.
To check the debug logs from the Hikari connection pool, set your logger in spring boot to debug mode as shown below.
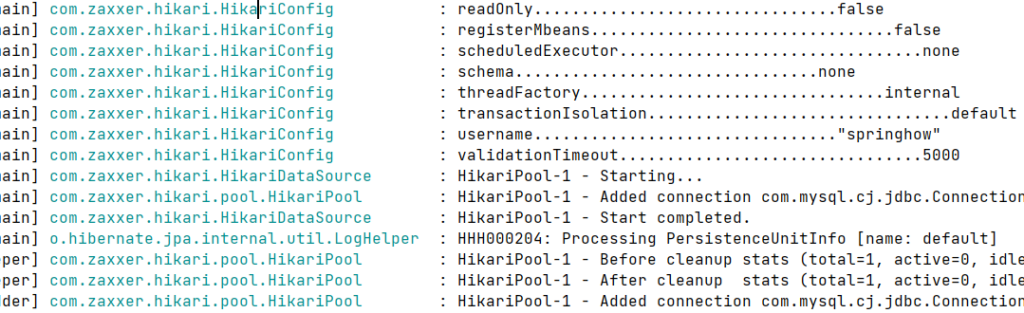
logging.level.com.zaxxer.hikari=DEBUGCode language: Properties (properties)With this setting, if you start the application, you can see the datasource config along with the connections being created.
You can even autowire the datasource object wherever you want and test the connections programmatically.
@Component
public class SomeComponent {
    public static final Logger logger = LoggerFactory.getLogger(SomeComponent.class);


    public SomeComponent(DataSource dataSource) throws SQLException {
        logger.info("Database connection valid = {}",dataSource.getConnection().isValid(1000));
    }
}
Code language: Java (java)
In the above example, we are using Constructor injection to load the datasource and testing a connection from the datasource. The log will print “true” if all the above setup was done properly.
Step 4: Working with the database
With the above in place, we can use various ways to access the database from our spring boot application.
- By directly getting connections from datasource and performing database operations (Not recommended at all).
- By using JdbcTemplate to run arbitrary SQL without boilerplace JDBC code. This way don’t have to write connection creation and closure.
- Using JPA as show in this Thymeleaf CRUD web Application with Example. With this approach, you can write JPQL that can translate into any database specific SQL.