Export to CSV file using Spring Boot
In this post, let’s look at how easy it is to export information from the database to a CSV file using Spring Boot and JPA. For this example, We are going to download data from tables using Spring JPA and write the response as CSV.
Approach
To demonstrate the export of data into a CSV file from a spring Boot application, we are trying the following approach.
- Add a CSV library of choice.
- Identify and gather the data you want to export. (Probably from a Database)
- Write the file content to a @Controller response.
- Make the response downloadable.
Add CSV library to Spring Boot
There are many CSV libraries available for use in Java. We are going with Apache Commons CSV because it is easier to implement. To add this dependency, include the below snippet to your spring boot project.
<dependency>
    <groupId>org.apache.commons</groupId>
    <artifactId>commons-csv</artifactId>
    <version>1.8</version>
</dependency>Code language: HTML, XML (xml)
As we stated earlier in our approach, We are going to use Spring JPA to read the data. And we will write the data as CSV to an HTTP response so the users can download the file.
<dependency>
    <groupId>org.springframework.boot</groupId>
    <artifactId>spring-boot-starter-data-jpa</artifactId>
</dependency>
<dependency>
    <groupId>org.springframework.boot</groupId>
    <artifactId>spring-boot-starter-web</artifactId>
</dependency>Code language: HTML, XML (xml)
With our dependencies in place, let’s write a JpaRepository to retrieve data.
Gather the Data that you want to export to CSV
To get the data to export, I wrote an entity and a repository for the EMPLOYEE table.
@Entity
public class Employee {
    @Id
    @GeneratedValue(strategy = GenerationType.IDENTITY)
    public Integer id;

    public String firstName;
    public String lastName;
    public String email;
    public String department;
... //Getter
... //Setter
}
Code language: Java (java)
@Repository
public interface EmployeeRepository extends JpaRepository<Employee,Integer> {
}Code language: Java (java)These will help retrieve the data in a list of objects for our service and controller.
Write a @Service for CSV export
As we have seen in our apache commons csv example, We need a Writer instance to write the CSV data into a file. In our case, We have a controller that needs to send the data as a downloadable response. Good thing is that We can use servletResponse.getWriter() to access a writer that can directly write to the HTTP response.
For now, the Service will simply pick the data and write to a Writer. It doesn’t care if the data goes to a file or a response or even a RabbitMQ exchange.
@Service
public class CsvExportService {

    private static final Logger log = getLogger(CsvExportService.class);

    private final EmployeeRepository employeeRepository;

    public CsvExportService(EmployeeRepository employeeRepository) {
        this.employeeRepository = employeeRepository;
    }

    public void writeEmployeesToCsv(Writer writer) {

        List<Employee> employees = employeeRepository.findAll();
        try (CSVPrinter csvPrinter = new CSVPrinter(writer, CSVFormat.DEFAULT)) {
            csvPrinter.printRecord("ID", "First Name", "Last Name","Email","Department");
            for (Employee employee : employees) {
                csvPrinter.printRecord(employee.getId(), employee.getFirstName(), employee.getLastName(), employee.getEmail(), employee.getDepartment());
            }
        } catch (IOException e) {
            log.error("Error While writing CSV ", e);
        }
    }
}Code language: Java (java)
As you can see, The writeEmployeesToCsv method takes a writer and uses it for the CSVPrinter to export the data. In the next step, We will be using the HTTPResponse.getWriter() to pass the writer. This way, the service is reusable to a file-based export solution as well.
Write a Spring @Controller To Download the Exported CSV
This is probably the easiest part. To make a downloadable CSV in Spring Boot, you need to autowire the HttpServletResponse object in your spring controllers. With this response object, You get two things.
- A writer where your Service can write the exported data in CSV format.
- A way to add headers for content-type and to trigger download on accessing the URL
@Controller
public class EmployeeController {

    private final CsvExportService csvExportService;

    public EmployeeController(CsvExportService csvExportService) {
        this.csvExportService = csvExportService;
    }

    @RequestMapping(path = "/employees")
    public void getAllEmployeesInCsv(HttpServletResponse servletResponse) throws IOException {
        servletResponse.setContentType("text/csv");
        servletResponse.addHeader("Content-Disposition","attachment; filename=\"employees.csv\"");
        csvExportService.writeEmployeesToCsv(servletResponse.getWriter());
    }

}Code language: Java (java)
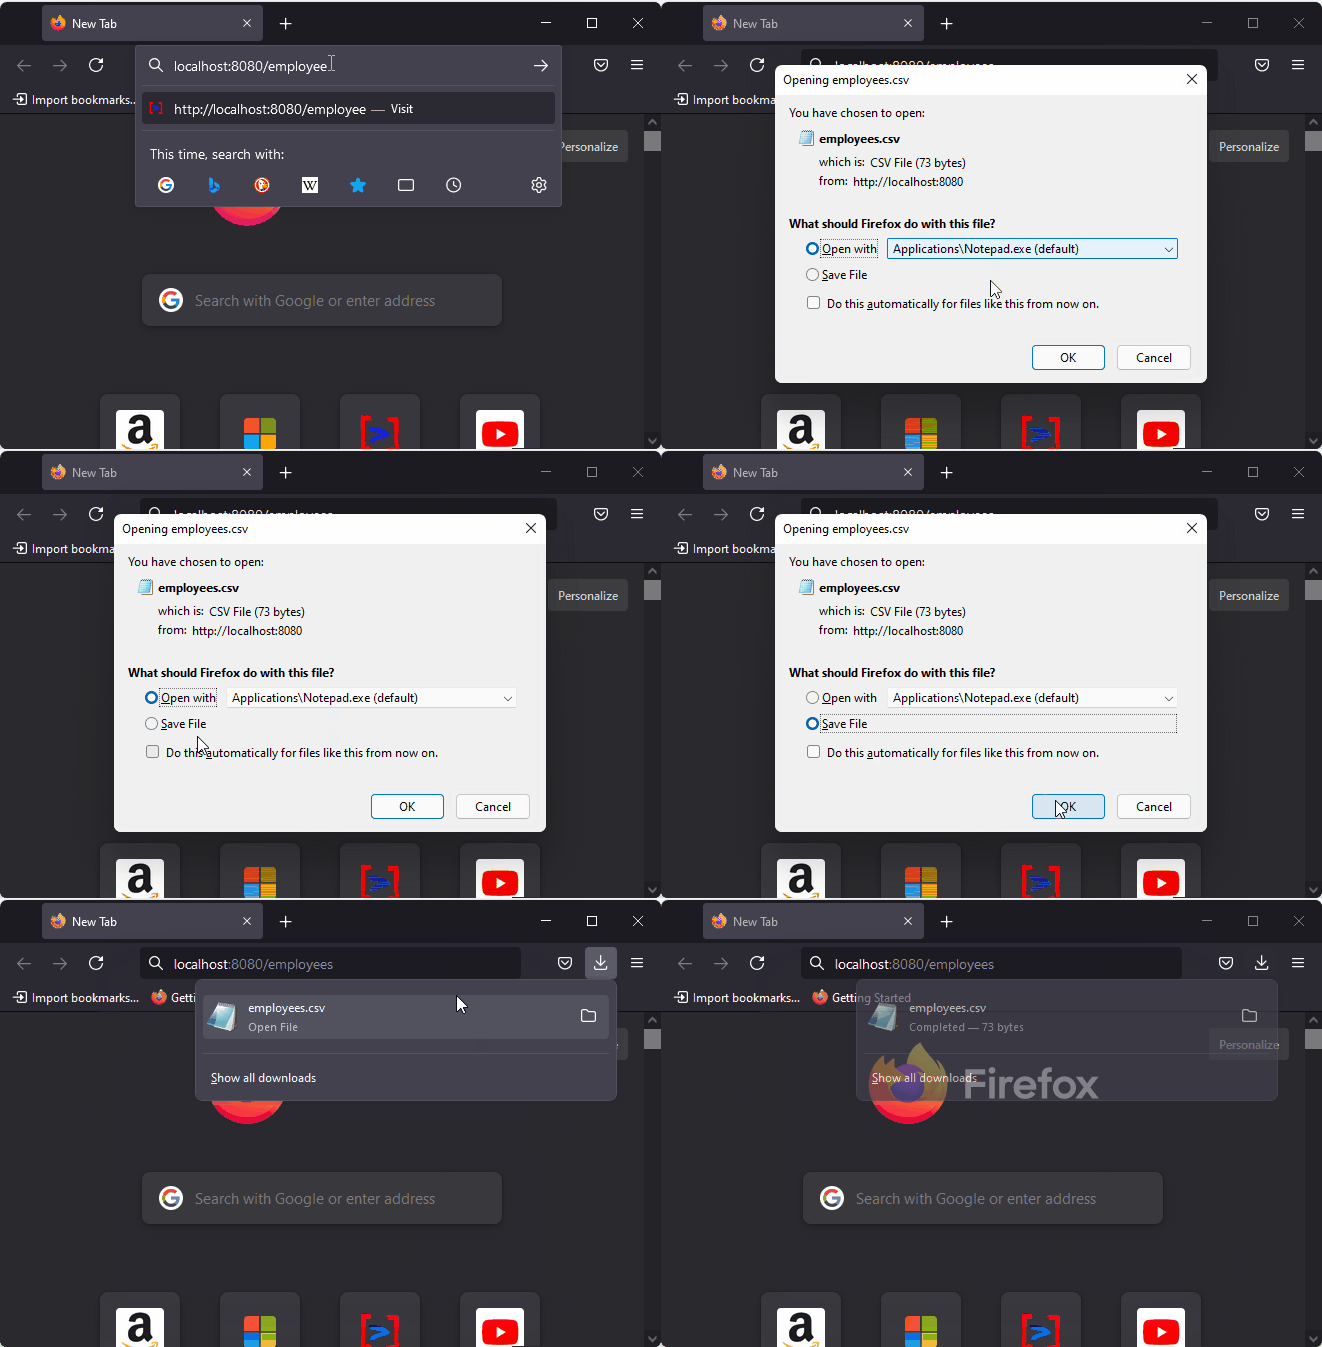
As you can see, the content type is set to “text/csv”. And we also added a Content-Disposition header to give the downloadable response a name. When you run this spring boot application and open http://localhost:8080/employees you will see that a CSV downloads.
Some details to note
This example uses Apache Commons CSV for writing data into CSV. But you can use any other library, like OpenCSV.
The content-disposition header is there to instruct the browser that the response is downloadable. Also, it provides a way to name the file when the browser downloads it. Otherwise, it is optional.

In the example, I used the findAll method to load all records into a list. Even though it is safe to a certain extent, you might want to either Stream or Paginate your database calls for better performance. Otherwise, you would load all data into memory and probably end up having OutOfMemoryErrors.
Finally, My example doesn’t use a header row for the export. But it is as simple as adding one more `printRecord()` with some header names.
You may find the below articles relevant to this topic.
Also, you can check out this example at our official GitHub repository.
Thank you for this clear and well-explained tutorial!
It really helped me with my current project, works like a charm.
I didn’t know it was so simple and tidy to do this with Spring.
how to add header in csv file
You could do something like this.
 csvPrinter.printRecord("ID", "First Name", "Last Name","Email","Department");
 for (Employee employee : employees) {
 csvPrinter.printRecord(employee.getId(), employee.getFirstName(), employee.getLastName(), employee.getEmail(), employee.getDepartment());
 }
I have updated the example to reflect the same.