Spring Boot RabbitMQ – Complete Guide For Beginners
RabbitMQ is a message broker that receives and forwards messages. In this post, You will learn how to use RabbitMQ with spring boot. Also, you will learn how to publish to and subscribe from queues and exchanges.
Setting up RabbitMQ in local machine
You can download the RabbitMQ installer from the official download page. However, It is easier to set up RabbitMQ as a docker image.
$ docker run -d --name rabbitmq -p 15672:15672 -p 5672:5672 rabbitmq:3-managementCode language: Bash (bash)You can also use a docker-compose file if you are comfortable with.
version: '3'
 services:
   rabbitmq:
     image: rabbitmq:3-management
     ports:
     - 5672:5672
     - 15672:15672Code language: YAML (yaml)
Once the docker container is up, verify that the RabbitMQ Management console is available at http://localhost:15672.
RabbitMQ Spring Boot Starter
RabbitMQ is an AMQP compliant message broker. For this reason, you just need to import the amqp starter from spring boot.
<dependency>
    <groupId>org.springframework.boot</groupId>
    <artifactId>spring-boot-starter-amqp</artifactId>
</dependency>Code language: HTML, XML (xml)
This dependency will auto-configure the connection to RabbitMQ available in the localhost.
Configure RabbitMQ in Spring Boot
By default, The docker image creates a user with credentials guest/guest. So let’s configure the connection properties accordingly.
spring.rabbitmq.host=localhost
spring.rabbitmq.port=5672
spring.rabbitmq.username=guest
spring.rabbitmq.password=guestCode language: Properties (properties)
Creating Queues in RabbitMQ
You can create queues and exchanges from the RabbitMQ management console. But, it is easier to create queues by declaring them in the application. Define a Queue Bean to create queues if not present.
@Bean
public Queue helloQueue() {
    return new Queue("hello");
}Code language: Java (java)
There are also variants to Queue constructor where you can define durable, autoDelete and exclusive properties.
By default Spring Boot will try to auto-create any Queue beans in the RabbitMQ server. If a queue already exists with the same name and different properties, then you may get the following error.
reply-code=406, reply-text=PRECONDITION_FAILED - inequivalent arg 'durable' for queue 'hello' in vhost '/'
Publishing Message To RabbitMQ from Spring Boot
Like RestTemplate and JdbcTemplate, Spring Boot offers rabbitTemplate to publish messages from Spring Boot. You can call methods from this auto-configured bean to send messages.
For instance, the following code will publish a string to the queue every 5 seconds.
@Autowired
private RabbitTemplate rabbitTemplate;
@Scheduled(fixedDelay = 5000)
public void pushMessage() {
String messageString = "Hello Rabbit @" + LocalDateTime.now().format(DateTimeFormatter.ISO_TIME);
rabbitTemplate.convertAndSend("hello", messageString);
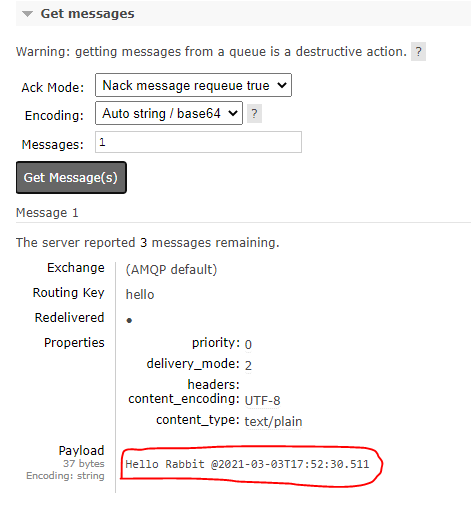
}Code language: Java (java)You can verify the message publishing by checking the messages in the web console.
Reading messages from RabbitMQ
To read messages from the Queue, you need to use the @RabbitListener annotation. This annotation takes a queue name or exchange. For example, the following code will print all messages from the queue named hello.
@RabbitListener(queues = "hello")
public void getString(String message) {
    logger.warn("From Queue : {}", message);
}Code language: Java (java)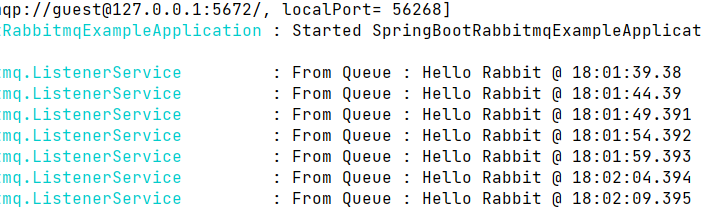
Publishing complex Objects
By default, Spring boot and RabbitMQ only supports Strings and byte arrays for message passing. This means you should only send java.lang.String objects or Java Serialized objects(JSO).
For example, let’s consider the following POJO class.
public class Notification implements Serializable {
    String subject;
    String content;
//getter setter tostring
}Code language: Java (java)
With this POJO, we will replace the string with an object in the call to rabbitTemplate.
@Scheduled(fixedDelay = 5000)
public void publishNotification() {
    rabbitTemplate.convertAndSend("helloPojo",
                  new Notification("Hello Rabbit", LocalTime.now().format(DateTimeFormatter.ISO_TIME)));
}Code language: Java (java)
As the parameter is a java object and not just a string, the message becomes a base64 encoded byte array.
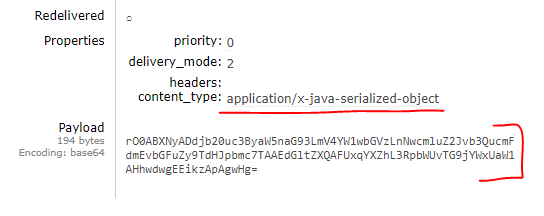
Let’s see how we can read this serialized message.
Reading Objects from RabbitMQ
Also note that At receiving end, we just need to specify the appropriate parameter type. Notice that I have
@RabbitListener(queues = "helloPojo")
public void getPojo(Notification message) {
    logger.info("From Queue : {}", message);
}Code language: Java (java)
As you see, Spring Boot takes care of Serializing the objects to and from RabbitMQ. However, there is one problem. So far we have been the producer and consumer of these messages. What if another application not based on java wants to read these messages?
By Default, A SimpleMessageConverter takes care of the serialization. If you could provide a custom MessageConverter, then the problem is solved. Let’s see how to do that.
Publish objects as JSON
If you plan on publishing Objects as JSON, you need to provide a MessageConverter implementation for the same. But, thanks to Spring Boot, it already comes with Jackson2JsonMessageConverter support.
To enable JSON support, You just need to add the following bean to your application.
@Bean
MessageConverter messageConverter(){
    return new Jackson2JsonMessageConverter();
}Code language: Java (java)
This bean requires the jackson mapper dependency for JSON conversion. If your spring boot project is an MVC or REST application, then you might already have it. If not, please add the following snippet to your pom.xml.
<dependency>
    <groupId>com.fasterxml.jackson.core</groupId>
    <artifactId>jackson-databind</artifactId>
</dependency>Code language: HTML, XML (xml)
Once added, you can immediately see the change in the message format.
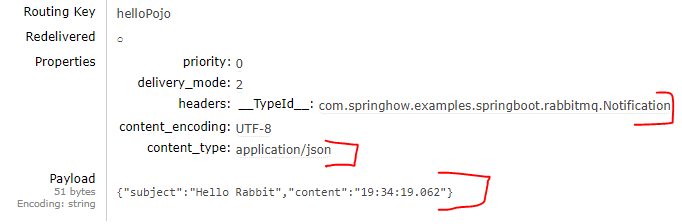
Note that the payload is now JSON and the content type is “application/json”. Also, pay attention to the headers. The __TypeId__ header lets the client know which class this JSON was from. If the client another spring boot application, then it can use this header hint and restore the object.
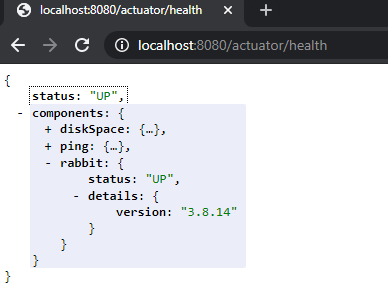
RabbitMQ Health Check Actuator Endpoint
Almost all the spring boot starters bring some form of health check contributor. And RabbitMQ starter is not any different. You can confirm this by Checking the health endpoint. You could learn more about health endpoints at The introduction to Spring Boot Health Endpoint.
Summary
So far, we learned how to integrate Spring Boot with RabbitMQ for message processing. We also learned to read and publish messages with RabbitMQ. We also learned how to do the same with JSON as the payload.
Please stay tuned for upcoming posts in AMQP and RabbitMQ. If you liked this article, you may also be interested in the following articles.
Also, you can find the project sample at this GitHub repository.