Thymeleaf CRUD web Application with Example
In this post, We will try to create a Simple Thymeleaf CRUD web application using Spring Boot.
A CRUD application lets you Create, Read, Update and Delete things like files, database entries etc. With the help of JPA repositories and their built-in methods, it’s easy implement this.
In this guide, we’ll learn how to build a CRUD web application with Spring Boot and Thymeleaf with an example.
Maven Dependencies for Thymeleaf
To set up necessary dependencies needed for Thymeleaf and JPA, We are adding the following maven dependencies. We also added h2 for embedded database for a quick setup.
<dependencies>
    <dependency>
        <groupId>org.springframework.boot</groupId>
        <artifactId>spring-boot-starter-data-jpa</artifactId>
    </dependency>
    <dependency>
        <groupId>org.springframework.boot</groupId>
        <artifactId>spring-boot-starter-thymeleaf</artifactId>
    </dependency>
    <dependency>
        <groupId>org.springframework.boot</groupId>
        <artifactId>spring-boot-starter-web</artifactId>
    </dependency>
    <dependency>
        <groupId>com.h2database</groupId>
        <artifactId>h2</artifactId>
        <scope>runtime</scope>
    </dependency>
</dependencies>Code language: HTML, XML (xml)
Data layer for CRUD application
To store and retrieve the data, we are going to create few JPA @Entity objects. To keep things simple, We only created a UserInfo entity.
@Entity
public class UserInfo {
    @Id
    @GeneratedValue(strategy = GenerationType.IDENTITY)
    private Integer id;
    private String firstName;
    private String lastName;
    private Role role;
    private boolean active = true;
    private LocalDateTime createdAt = LocalDateTime.now();
    private LocalDateTime updatedAt = LocalDateTime.now();
}Code language: PHP (php)
This entity will be used by our CRUD service, controller and the thymeleaf view classes for further usage. This class will handle the user’s details like name, role and importantly the active flag. This flag is to soft delete the records without actually deleting them from the tables.
These objects can then be iterated using thymeleaf’s th:each attribute.
CRUD Repositories
One of the many ways to access database records is through JPA repositories. When you already have an JPA entity, You can simply write an interface that extends JpaRepository as shown below.
@Repository
public interface UserInfoRepository extends JpaRepository<UserInfo, Integer> {

    List<UserInfo> findAllByActiveOrderByIdDesc(boolean active);

    Optional<UserInfo> findByIdAndActive(Integer id, boolean active);

}Code language: PHP (php)
This repository can then be autowired everywhere to use the predefined methods like findById(ID),findAll(),save(T) , and delete(T) etc. These methods define every operation of a CRUD application.
For instance, save() method can be used to create and update objects in the database. Similarly, findAll and findById lets you read values from the database. Obviously, delete() method deletes the supplied entity.
In the above implementation, We made sure we only read the active records. This is because of the soft delete we spoke about earlier. So instead of using findAll, we are using findAllByActiveOrderByIdDesc. Similar to that we will be using findByIdAndActive instead of findById so that we don’t show inactive users to the users.
CRUD Service Class
The crudRepository methods won’t call themselves. The appropriate place to use these repositories are through a service layer. Let’s write our business logic for our application by utilizing the UserInfoRepository that we just created.
@Service
public class UserService {

    private final UserInfoRepository userInfoRepository;

    public UserService(UserInfoRepository userInfoRepository) {
        this.userInfoRepository = userInfoRepository;
    }

    public UserInfo getUser(Integer id) {
        return userInfoRepository.findByIdAndActive(id, true).orElseThrow(NotFoundException::new);
    }

    public UserInfo createUser(UserInfo userInfo) {
        return userInfoRepository.save(userInfo);
    }

    public List<UserInfo> getUsers() {
        return userInfoRepository.findAllByActiveOrderByIdDesc(true);
    }

    public UserInfo updateUser(Integer id, UserInfo request) {
        UserInfo fromDb = getUser(id);
        fromDb.setFirstName(request.getFirstName());
        fromDb.setLastName(request.getLastName());
        fromDb.setRole(request.getRole());
        fromDb.setActive(request.isActive());
        fromDb.setUpdatedAt(LocalDateTime.now());
        return userInfoRepository.save(fromDb);
    }
}Code language: PHP (php)
The code is straightforward as there are only two details to note here. The getUser method throws a NotFoundException if the user is not available in the database. This way we can show custom error codes like 404 Not Found instead of a standard 500 Internal Server Error.
The other detail is in the updateUser method. This method as a whole updates the userInfo object by loading it from the database and saving it with new details. The good thing about implementing it this way is that the same method can be used to soft-delete the records if the update request contains active=false.
CRUD operations in Thymeleaf
I will try to break down each operation of CRUD as we progress in this tutorial. As we have already established the service layer, We just need to work on the View and Controllers.
To keep it simple, We are only including the important snippets here. Please feel free to check out the source code from git-repo at the end of this guide.
Read Operation(CRUD)
Reading all the entries in the database or a single entry is not a big task. We can use the getUser or getUsers method from the service layer for this. However, showing them in the UI takes some work from the thymeleaf side. To show the current list of users, first, we need to write a controller and point it to a thymeleaf template.
With Spring MVC annotations and its rich support to thymeleaf, it’s pretty simple. All you have to do is to list all the users, add them to a model and return the name of the view that needs to be rendered.
@RequestMapping(path = "/", method = RequestMethod.GET)
public String getUsers(Model model){
        List<UserInfo> users=userService.getUsers();
        model.addAttribute("users",users);
        model.addAttribute("userInfo",new UserInfo());
        return"users";
}Code language: PHP (php)
The view name here is users. Also ignore the userInfo model attribute at this point. We will revisit this later in this article. We created a thymeleaf template file under src/main/resources/templates/ called users.html to match the method. Here is a snippet of the table where we will see the user details.
Thymeleaf template
...
<table>
    <tr>
        <th>ID</th>
        <th>First Name</th>
        <th>Last Name</th>
        <th>Role</th>
        <th>Created At</th>
        <th>Updated At</th>
        <th>Actions</th>
    </tr>
    <tr th:if="${#lists.isEmpty(users)}">
        <td colspan="7">No Records found. Add some...!</td>
    </tr>
    <tr th:each="user : ${users}">
        <td th:text="${user.id}"></td>
        <td th:text="${user.firstName}"></td>
        <td th:text="${user.lastName}"></td>
        <td th:text="${user.role}"></td>
        <td th:text="${user.createdAt}"></td>
        <td th:text="${user.updatedAt}"></td>
        <td><a th:href="'/' + ${user.id}">✏</a></td>
    </tr>
</table>
...Code language: HTML, XML (xml)
Here each records also have links for editing them by using th:href="'/' + ${user.id}". We will see the use of this at the update section.
Create Operation (CRUD)
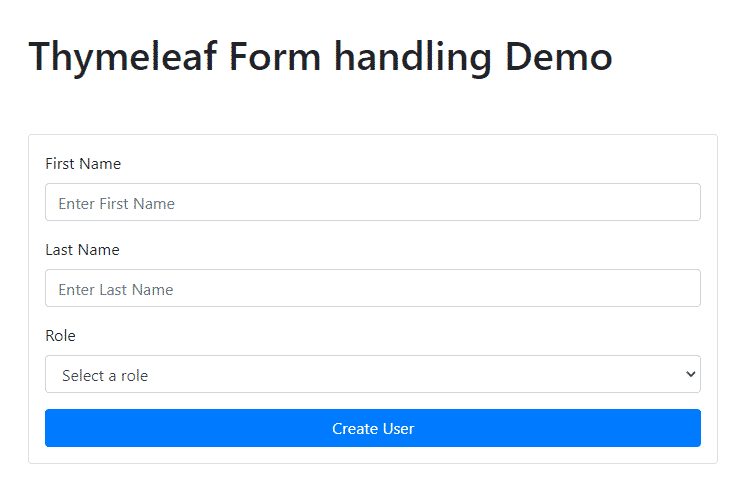
Create operation requires a form, and a endpoint to receive the submitted form values. In our users.html, add the following form snippet.
...
<form method="post" th:action="@{/}" th:object="${userInfo}">
    <input id="firstName" placeholder="Enter First Name" required th:field="*{firstName}" type="text"/>
    <input id="lastName" placeholder="Enter Last Name" required th:field="*{lastName}" type="text"/>
    <select id="role" required th:field="*{role}">
        <option hidden value="">Select a role</option>
        <option>GUEST</option>
        <option>USER</option>
        <option>ADMIN</option>
    </select>
    <input type="submit" value="Create User">
    <input type="reset" value="Reset">
</form>
...Code language: HTML, XML (xml)
As you see, The form’s request method is post and it is pointing to the controller method mapped at /. Also, the form object has been marked with th:object. This let’s spring MVC and thymeleaf know that the form parameters are to be mapped to a form-backed bean. More on this at out post about Thymeleaf form handling.
This thymeleaf form is responsible for the CREATE of Crud application.
Let’s write a methods that handles these request payload. As we stated earlier, the form details can be received using @ModelAttribute UserInfo userInfo. Now that we have our object, we can call userService.createUser to create a new database entry.
After user creation you might ideally want to show the same form and the list of current active users. So it is better to do a redirect to the listing page. So a typical implementation would look like below.
@RequestMapping(path = "/", method = RequestMethod.POST)
public String createUser(@ModelAttribute UserInfo userInfo){
        userService.createUser(userInfo);
        return"redirect:/";
}Code language: JavaScript (javascript)
If you want to go for extra-mile, you may want to add a message that says “User created” or something. The problem here is you can’t add model attributes in one method and redirect it to a different controller. To achieve this, what you need is RedirectView and RedirectAttributes. Here is an example using redirects with a custom action message in a CRUD web application using thymeleaf.
All you have to do here is to create a RedirectView with appropriate path to redirect. Along with that you need to set the Model attributes as FlashAttributes
@RequestMapping(path = "/", method = RequestMethod.POST)
public RedirectView createUser(RedirectAttributes redirectAttributes,@ModelAttribute UserInfo userInfo){
        userService.createUser(userInfo);
        String message="Created user <b>"+userInfo.getFirstName()+" "+userInfo.getLastName()+"</b> ✨.";
        RedirectView redirectView=new RedirectView("/",true);
        redirectAttributes.addFlashAttribute("userMessage",message);
        return redirectView;
}Code language: JavaScript (javascript)
Now, you can use something like the below snippet to show the message as well. It will show the message only if it exists(th:if).
<div th:if="${userMessage}" th:utext="${userMessage}"></div>Code language: HTML, XML (xml)Remember adding model.addAttribute("userInfo",new UserInfo()) in the getUsers(Model model) controller method? We have done this because, Thymeleaf must bind the th:object to a ModelAttribute. The easier way to do is by adding an empty object in the model itself than injecting it on the method. Check the controller section of How thymeleaf handles forms for more details.
Update & Delete Operations(CRUD)
Each record in the users view has a link where we can edit or delete them. For this we need to create a separate view called edit.html. To render this view, we need a new controller method.
@RequestMapping(path = "/{id}", method = RequestMethod.GET)
public String getUser(Model model,@PathVariable("id") Integer id){
        UserInfo userInfo=userService.getUser(id);
        model.addAttribute("userInfo",userInfo);
        return"edit";
}Code language: JavaScript (javascript)
Here is the form snippet from edit.html. The trick here is to use two separate buttons for Update and Delete and a hidden <input> tag to bind the active flag.
Thymeleaf form for UPDATE and DELETE crud operations
...
<form method="post" th:action="'/'+${userInfo.id}" th:object="${userInfo}">
    <input id="firstName" placeholder="Enter First Name" required th:field="*{firstName}" type="text"/>
    <input id="lastName" placeholder="Enter Last Name" required th:field="*{lastName}" type="text"/>
    <select id="role" required th:field="*{role}">
        <option hidden value="">Select a role</option>
        <option>GUEST</option>
        <option>USER</option>
        <option>ADMIN</option>
    </select>
    <input id="activeFlag" type="hidden" th:field="*{active}" value='true'>
    <input type="submit" value="Update"
           onclick="document.getElementById('activeFlag').value='true'">
    <input type="submit" value="Delete"
           onclick="document.getElementById('activeFlag').value='false'">

</form>
...Code language: HTML, XML (xml)
We can use javascript onclick-events to keep the active flag as true for updates and mark the flag as false for delete operations.
Now, let’s write the controller method that handles UPDATE and DELETE operations of CRUD from thymeleaf form. Like we did for the creation, We have to call userService.updateUser method and pass necessary parameters. Once the operation is complete, we need to return to the home page.
So here is the controller method with appropriate display message handling as well.
@RequestMapping(path = "/{id}", method = RequestMethod.POST)
public RedirectView updateUser(RedirectAttributes redirectAttributes,@PathVariable("id") Integer id,@ModelAttribute UserInfo userInfo){
        userService.updateUser(id,userInfo);
        String message=(userInfo.isActive()?"Updated ":"Deleted ")+" user <b>"+userInfo.getFirstName()+" "+userInfo.getLastName()+"</b> ✨.";
        RedirectView redirectView=new RedirectView("/",true);
        redirectAttributes.addFlashAttribute("userMessage",message);
        return redirectView;
}Code language: JavaScript (javascript)
Testing the Thymeleaf application
If we have done all of this right, we should see a CRUD application UI with a form to operate on user details as shown below..
Conclusion
To conclude, We learned how to create a Spring Boot CRUD application using Thymeleaf. You can checkout this github repository for the source code.