Thymeleaf Fragments in Spring Boot Application
Thymeleaf fragments let you break down your templates into reusable layout elements. For example, Several pages may have different content but still have the same header and footer. In these cases, Writing these into a separate template file and reusing it is not a bad idea.

Fragments in Action
Let’s take this snippet from a hypothetical home page.
<body class="container">
<nav class="navbar bg-dark navbar-dark navbar-expand-lg">
    <a class="navbar-brand" href="#">Logo</a>
    <div class="navbar-nav w-100 ml-auto" th:each="menu : ${menus}">
        <a class="nav-link" th:href="${menu.url}" th:text="${menu.label}"></a>
    </div>
</nav>
....
.... Some content of the home page
....
</body>Code language: HTML, XML (xml)
Here, The navbar logic would never change for different thymeleaf view. In these cases, we can define the navbar HTML into a separate fragment and import it everywhere as we want it. Let’s split our template.
First, create a thymeleaf fragment file fragments/navbar.html under the templates directory.
<nav class="navbar bg-dark navbar-dark navbar-expand-lg">
    <a class="navbar-brand" href="#">Logo</a>
    <div class="navbar-nav w-100 ml-auto" th:each="menu : ${menus}">
        <a class="nav-link" th:href="${menu.url}" th:text="${menu.label}"></a>
    </div>
</nav>Code language: HTML, XML (xml)
Now, you can include this fragment into the home.html as shown below.
<body class="container">
<div th:replace="fragments/navbar"></div>
....
.... Some content of the home page
....
</body>Code language: HTML, XML (xml)
Ways to include thymeleaf fragments
We can include other fragments into a template in two different ways. Let’s find about each one of them.
th:insert Directive
If you want the fragment to be wrapped around by a parent tag, you should use th:insert. Here is the syntax for this approach.
<div th:insert="fragments/navbar" id="this-will-be-retained">This content will be gone</div>Code language: HTML, XML (xml)The above snippet will result in a div containing the content of the navbar.html as shown below.
<div id="this-will-be-retained">
    <nav class="navbar bg-dark navbar-dark navbar-expand-lg">
        <a class="navbar-brand" href="#">Logo</a>
        <div class="navbar-nav">
            <a class="nav-link" href="/">Home</a>
        </div>
        <div class="navbar-nav">
            <a class="nav-link" href="/about">About us</a>
        </div>
        <div class="navbar-nav">
            <a class="nav-link" href="/contact">Contact us</a>
        </div>
    </nav>
</div>Code language: HTML, XML (xml)
As you see, the div tag exists with its original attribute.
th:replace directive
You can specify where to include a fragment using the th:replace directive. This directive will remove the current element and fill it with the content of the fragment.
<div th:replace="fragments/navbar">This content will be gone</div>Code language: HTML, XML (xml)Here the <div> element itself will be replaced by the content of navbar.html. The resultant code would look like this.
<nav class="navbar bg-dark navbar-dark navbar-expand-lg">
    <a class="navbar-brand" href="#">Logo</a>
    <div class="navbar-nav">
        <a class="nav-link" href="/">Home</a>
    </div>
    <div class="navbar-nav">
        <a class="nav-link" href="/about">About us</a>
    </div>
    <div class="navbar-nav">
        <a class="nav-link" href="/contact">Contact us</a>
    </div>
</nav>Code language: HTML, XML (xml)
Points to note about thymeleaf fragments
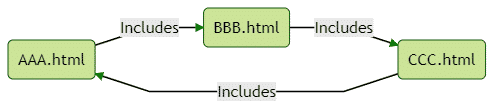
- Fragments can be nested. That is, one fragment can contain another fragment. However, Make sure you don’t make a cyclic dependency. For example, the following scenario will lead to infinite recursion.
- In both
th:insertandth:replacethe content of the surrounding div is removed. - Fragments are loaded from the relative path from the file it is invoked.
- There is also a
th:includeBut this is just a deprecated version ofth:insert.
Learn more about thymeleaf in the list of posts on that topic.
Hi, springhow is very helpful. Please share the source code for this tutorial for better understanding.
Regards,
Anil