Logging In Spring Boot
Spring Boot uses Apache Commons Logging under the hood. However, it lets you choose a logging library of your choice. Let’s take a look at Some of the configurations and best practices while using Spring Boot.
Table of contents
Overview
By default, if you use the starters, then your application will use Logback for logging. The framework also provides various log routing to make sure other logging libraries work out-of-the-box. This way, You could swap Logback with Log4j2 or JUL.
Before going any further, there are many logging frameworks out there for Java. And in most cases, you do not need to change your logging dependencies in Spring boot.
Simple Logging Example
Let us demonstrate logging in spring-boot with an example controller.
import org.slf4j.Logger;
import org.slf4j.LoggerFactory;
import org.springframework.stereotype.Controller;
import org.springframework.web.bind.annotation.*;


@Controller
public class TestController {

  private static final Logger log = LoggerFactory.getLogger(TestController.class);

  @RequestMapping("/test")
  @ResponseBody
  String hello(@RequestParam("name") String name) {
    log.trace("Hello {}", name);
    log.debug("Hello {}", name);
    log.info("Hello {}", name);
    log.warn("Hello {}", name);
    log.error("Hello {}", name);
    return "Hello";
  }
}
Code language: JavaScript (javascript)
With the above controller, if you hit http://localhost:8080/test?name=John Doe, then you will see some logs in the console output. That’s it, You have used logging successfully in your project.
And the best part is, You didn’t configure anything.
Configuring Logging
Spring boot comes with some default config for logging. For instance, it prints to console out of the box, it has a detailed message log pattern which we will see in detail, and finally, it only prints log levels with INFO or above.
Let us see how to override these behaviors.
Changing Log levels
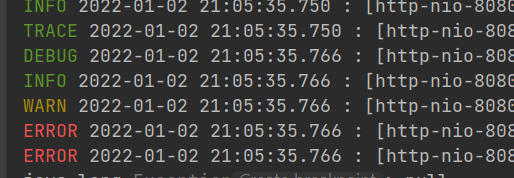
If you have seen the example from the previous section, The logs would have only printed entries for INFO or above. But if you wish to override this behavior, then spring boot allows you to configure logging levels based on classes and packages.
For example, you can enable TRACE logs for TestController as shown below.
logging.level.com.springhow.examples.logging.controllers.TestController=TRACEIf you wish to enable debug logs for all classes under a package, then you can do so like below.
logging.level.com.springhow.examples.logging.controllers=DEBUGYou could also group different packages and classes into groups. For example, you can list all packages relevant for your APIs into a logger group. And then you can specify a logging level for it.
#Define a group
logging.group.api=com.springhow.web,com.springhow.services,com.springhow.domain
#Specify a logging level for that group
logging.level.api=DEBUGCode language: PHP (php)
With this approach, you do not need to define three separate logging levels. Also, it makes the config file looks clean.
And for our ease, Spring boot provides web and sql and logging groups so that we can easily configure them for debugging.
Writing logs to Files
By default, Spring boot prints all logs to the console. But with the following configuration, you can enable file-based logging as well. For example, the following config creates a log file in the current working directory.
logging.file.name=springhow.logYou can also give a full path for the file name
logging.file.name=/var/log/springhow.logCode language: JavaScript (javascript)Alternatively, you could give a logging file path.
logging.file.path=/var/log/Code language: JavaScript (javascript)The only exception with using “logging.file.path” is that spring boot will create a log file named “spring.log” under the given path.
For WINDOWS, all absolute paths translate from C:\ drive. So, “/var/log/” becomes “c:\var\log\“.
Most importantly, if you use logging.file.name and logging.file.path together, then logging.file.name will take precedence.
Changing logging pattern in Spring Boot
The default logger format/pattern from Spring Boot looks something like below.

For many, this vibrant logging pattern is more than enough. However, if you wish to change this log pattern, then you can use the “logging.pattern.console” and “logging.pattern.file” properties.
In the following example, we can see how easy it is to override the log format.
logging.pattern.console=%p %d{yyyy-MM-dd HH:mm:ss.SSS} : [%t] %-40.40logger{39} : %m%n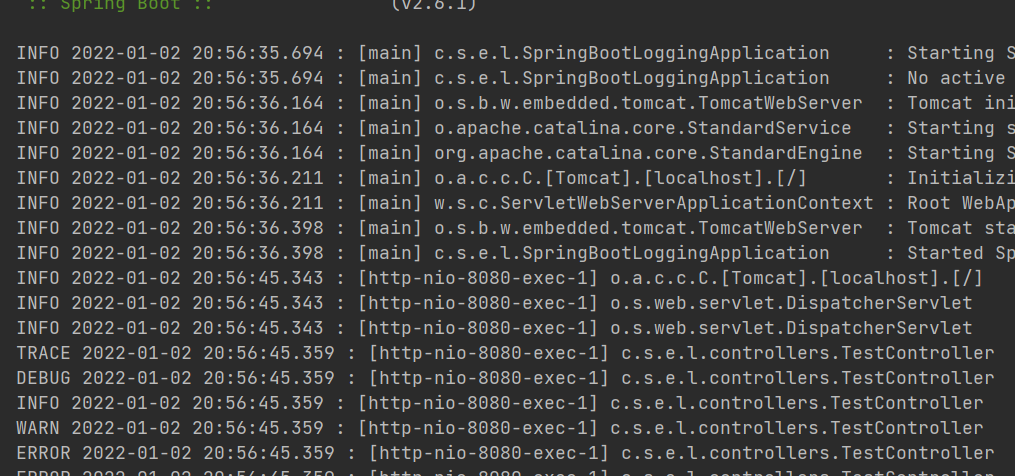
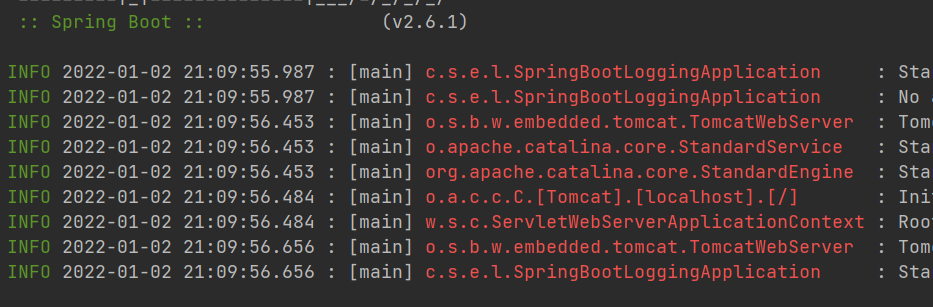
As you see in the image, The log level is at the beginning of the line, and no more vibrant colors. Check Logback Pattern docs for more info.
Color-coding your log entries
In an ANSI color-supported environment, you can use patterns that can different log components in different colors. For example, you can set the colors by logging level using %clr(%p). Here, %p represents logging level.
Here, all the color mapping is provided by spring boot. If you wish to specify your colors for log components, you can also do so.
logging.pattern.console=%clr(%p) %d{yyyy-MM-dd HH:mm:ss.SSS} : [%t] %clr(%-40.40logger{39}){red} : %m%nThe above config results in,
There is no point in setting the color coding for logging.pattern.file as files don’t translate ANSI color coding. So you will see a bunch of gibberish.
Custom Logging Configuration file
All these default behaviors are possible because spring boot comes with default logging configuration files. It also provides us with ways to configure these configs to some extent.
However, if you wish to use a more savage configuration, then you can provide your own as well. Just provide a logback.xml or logback-spring.xml under src/main/resources/ and you are good to go.
<configuration>
  <appender name="STDOUT" class="ch.qos.logback.core.ConsoleAppender">
    <!-- encoders are assigned the type
         ch.qos.logback.classic.encoder.PatternLayoutEncoder by default -->
    <encoder>
      <pattern>%d{HH:mm:ss.SSS} [%thread] %-5level %logger{36} - %msg%n</pattern>
    </encoder>
  </appender>

  <root level="debug">
    <appender-ref ref="STDOUT" />
  </root>
</configuration>
Code language: HTML, XML (xml)
Note that once, you add your logback.xml, You can’t customize logging through the application.properties.
You could also load a logging configuration from an external location using the “logging.config” property.
logging.config=/etc/myapp/logback.xmlCode language: JavaScript (javascript)With a custom configuration, you can almost do all the above customizations. But the only catch is that you can’t switch your spring boot application to a different logging system easily. For example, if you want to switch to Log4j2, then you need to recreate the configuration for that specific system.
Log4j2 for Spring Boot Logging
Changing your logging system in spring boot is pretty straightforward if you do not have a custom config. For example, you can swap to Log4J2 just by removing the default spring-boot-starter-logging with spring-boot-starter-log4j2.
The logging starter is part of the Core Starter(spring-boot-starter). So you can safely remove the logging starter from there.
<dependency>
  <groupId>org.springframework.boot</groupId>
  <artifactId>spring-boot-starter</artifactId>
  <exclusions>
    <exclusion>
      <groupId>org.springframework.boot</groupId>
      <artifactId>spring-boot-starter-logging</artifactId>
    </exclusion>
  </exclusions>
</dependency>
<dependency>
  <groupId>org.springframework.boot</groupId>
  <artifactId>spring-boot-starter-log4j2</artifactId>
</dependency>Code language: HTML, XML (xml)
Even if you have many different starters like “web”, “jpa” etc, they all will now exclude the starter for logging and will use the configuration from log4j2 instead. And the best part is, you do not have to change anything in the application.properties( if you haven’t specified anything related to logback).
Summary
So far, we learned how logging in spring boot works, how to configure them, and how to replace logback with log4j2 in a Spring boot application.