Introduction to WebSocket with Spring Boot
Let’s look at how to add WebSocket support to a spring boot application. We will try to create a simple chat application. Note that this implementation does not use STOMP.
What is WebSocket?
The WebSocket protocol helps establish a full-duplex two-way communication between client and server over a single TCP connection. This protocol is different from HTTP but works over HTTP for compatibility.
Adding Websocket Support to Spring Boot
To add WebSocket support, you should add the following dependency to your spring boot project.
<dependency>
	<groupId>org.springframework.boot</groupId>
	<artifactId>spring-boot-starter-websocket</artifactId>
</dependency>Code language: HTML, XML (xml)
Note that we will use the basic version of the web socket to provide a public group chat.
Create a WebSocket Handler
Like many protocols, WebSocket follows a client-server architecture. In our case, the javascript on browsers will act as clients, and the spring boot server will serve as a WebSocket server.
public class ChatMessageHandler extends TextWebSocketHandler {

    List<WebSocketSession> webSocketSessions = Collections.synchronizedList(new ArrayList<>());

    @Override
    public void afterConnectionEstablished(WebSocketSession session) throws Exception {
        super.afterConnectionEstablished(session);
        webSocketSessions.add(session);
    }

    @Override
    public void afterConnectionClosed(WebSocketSession session, CloseStatus status) throws Exception {
        super.afterConnectionClosed(session, status);
        webSocketSessions.remove(session);
    }

    @Override
    public void handleMessage(WebSocketSession session, WebSocketMessage<?> message) throws Exception {

        super.handleMessage(session, message);
        for (WebSocketSession webSocketSession : webSocketSessions) {
            webSocketSession.sendMessage(message);
        }
    }

}Code language: Java (java)
Let’s go through this class part by part. Web sockets support both TEXT and BINARY-based communication. In our case, We are using a TextWebSocketHandler to deal with messages. This class already comes with a default implementation. But we want to receive messages and send them to other sessions we have.
So, Whenever a new client connects, we will store them in an in-memory list. And when the client disconnects, we will clear them from the list. When one of the clients sends a message, We can forward that message to all other WebSocket sessions connected to our spring boot application.
It is important to note that this implementation is for the sake of the demo. Also, this example tries to broadcast every message to everyone, including the sender. Even though this might be a valid case for a chat application, you might need to use a database to store the data and respond with processed results in real life.
We must map this handler to a path the clients can recognize.
Spring configuration for WebSocket
We have our handler. But Spring needs to know about the handler we created. Also, spring boot will take care of specific configurations for the WebSocket setup. Here is a simple configuration class. Like before, let’s go through this class part by part.
@Configuration
@EnableWebSocket
public class WebSocketConfig implements WebSocketConfigurer {

    @Override
    public void registerWebSocketHandlers(WebSocketHandlerRegistry webSocketHandlerRegistry) {
        webSocketHandlerRegistry.addHandler(new ChatMessageHandler(), "/hello");
    }

}
Code language: Java (java)
The @Configuration annotation bootstraps @Enable* type annotations. In this case, We have @EnableWebSocket. This annotation makes sure the autoconfiguration for WebSocket is done. Also, note that we are using registerWebSocketHandlers() method to map the ChatMessageHandler to the path “/chat”.
Simple JavaScript Web socket Client
Let’s move to the client as we have completed our server part. Every modern browser supports WebSocket protocol by default. Here is a simple HTML to send and receive messages.
<!doctype html>
<html lang="en">
<head>
    <meta charset="UTF-8">
    <meta name="viewport"
          content="width=device-width, user-scalable=no, initial-scale=1.0, maximum-scale=1.0, minimum-scale=1.0">
    <meta http-equiv="X-UA-Compatible" content="ie=edge">
    <title>Document</title>
    <script type="application/javascript">
        let ws;

        function connect() {
            ws = new WebSocket("ws://localhost:8080/hello");
            ws.onmessage = function (e) {
                printMessage(e.data);
            }
            document.getElementById("connectButton").disabled = true;
            document.getElementById("connectButton").value = "Connected";
            document.getElementById("name").disabled = true;
        }

        function printMessage(data) {
            let messages = document.getElementById("messages");
            let messageData = JSON.parse(data);
            let newMessage = document.createElement("div");
            newMessage.innerHTML = messageData.name + " : " + messageData.message;
            messages.appendChild(newMessage);
        }

        function sendToGroupChat() {
            let messageText = document.getElementById("message").value;
            document.getElementById("message").value="";
            let name = document.getElementById("name").value;
            let messageObject = {
                name: name,
                message: messageText
            }
            ws.send(JSON.stringify(messageObject))
        }
    </script>
</head>
<body>
<input type="text" id="name"><input id="connectButton" type="button" value="Connect" onclick="connect()">
<div id="messages"></div>
<input type="text" id="message">
<input type="button" value="send" onclick="sendToGroupChat()">
</body>
</html>
Code language: HTML, XML (xml)
Let’s break this down. In Javascript, you can connect to a web socket using WebSocket built-in type. This type requires a “ws://” endpoint to connect to the server.
Once connected, We can use methods like send, onmessage, onerror, onopen and onclose methods to deal with the associated session. We use the onmessage event to receive the data and show it on the HTML page. Similarly, we can use the send method to publish a message to the server.
Spring Boot WebSocket in Action
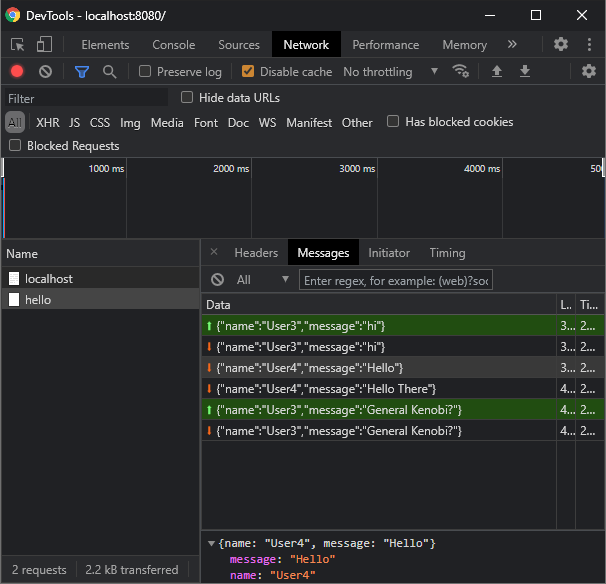
Here is a demo that explains how the WebSocket works in real time.
As you can see, Once connected to the servers, each page gets the messages. This is possible via the onmessage method. Also, if you go to the Chrome developer tools network tab, you can see all messages sent and received through the WebSocket connection.
Summary
We learned how to write a simple WebSocket server-client implementation using Spring Boot and JavaScript. Note that the WebSocket only work in modern browsers that support WebSocket. Check this list of browsers that support WebSocket for more info.
Also, the basic WebSocket implementation has a couple of disadvantages. For example, the socket connection will be reset on page refresh. So, you must handle and identify each client(via a stateful approach). As I mentioned earlier, not all browsers support web sockets. This means you should write a fallback mechanism to avoid those browser-related issues.
Importantly, this example is done without STOMP. We will cover that in an upcoming post. So stay tuned.
All the code mentioned above is available in our GitHub repository. Feel free to check out and run the application on your own.
Is it intentional that the spring setup has /chat and the javascript setup has /hello as the endpoints?
Hey. Thanks for pointing out. It was indeed supposed to be /chat at both ends. In the recent updates, I have made changes to the repository and some parts of the post but didn’t do the due diligence on the controller sections. I have corrected it now. Thanks again for making the post more accurate.
When I run this program, the new Websocket line on the client side fails.
Without seeing the code, it’s difficult to determine the root cause of the problem. However, here are some general tips that may help you resolve the issue:
Make sure that both the client and server are using the same WebSocket protocol version. WebSocket has several versions and it’s important that both sides are using the same version.
Check that the WebSocket server is running and listening on the correct port. If the server is not running or is listening on the wrong port, the client won’t be able to connect.
Ensure that any firewalls or security settings are not blocking the WebSocket connection. Some networks or security settings may block WebSocket connections, so it’s important to check that these settings are not interfering with your program.
Check for errors in your client-side code. Make sure that the WebSocket URL is correctly formatted and that any other relevant settings, such as the WebSocket subprotocol, are set correctly.
Check for errors in your server-side code. Make sure that the server is correctly handling WebSocket connections and sending/receiving data as expected.
Use a WebSocket debugging tool to help diagnose the issue. There are several tools available that can help you debug WebSocket connections, such as the Chrome Developer Tools or the Firefox Web Console.
I hope these tips help you resolve the issue and get your WebSocket connection working properly. If you continue to have trouble, please feel free to share your code and I can take a closer look.