Spring Boot H2 Database
Introduction
Let’s learn how to use the h2 database with the spring boot application and its configuration via application properties. H2 is an in-memory database that we can embed within the application. For this reason, H2 is the right candidate for loading test data or to prototype an application.
Spring Boot Dependencies
Spring Boot doesn’t require any special configuration for h2 database to work. Both JDBC and JPA starters have built in support for h2 database.
<dependency>
    <groupId>org.springframework.boot</groupId>
    <artifactId>spring-boot-starter-jpa</artifactId>
</dependency>
<dependency>
    <groupId>com.h2database</groupId>
    <artifactId>h2</artifactId>
    <scope>runtime</scope>
</dependency>Code language: HTML, XML (xml)
Here, the starter dependency will take care of all the configuration. At this point, you can simply start the application and spring boot will configure the database automatically.
H2 Spring Boot Configuration
By default, Spring Boot creates an h2 database a default user called SA with no password. But, we can change these values using the application.properties.
spring.datasource.url=jdbc:h2:mem:local
spring.datasource.username=someuser
spring.datasource.password=somepassword
To change the database name, simply provide a different connection string in the spring.datasource.url
As you see, the data source URL is pointing to an in-memory version of the h2 database called local. However, you can use a file-based h2 database using the following settings.
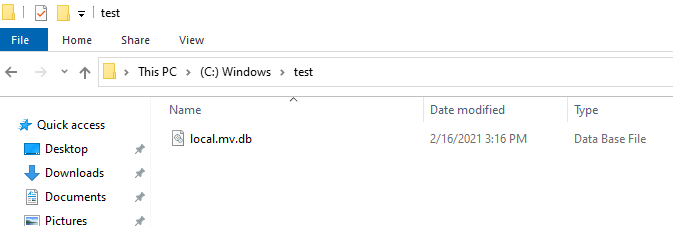
spring.datasource.url=jdbc:h2:c:/test/localCode language: JavaScript (javascript)After this change, you can see that a new DB file at the configured location.
Loading Application data
The primary use of the H2 database is for testing and prototyping. This means the application has to load data into the database whenever the application starts. for this, spring boot offers automatic schema creation for embedded database types. For instance, Spring boot will automatically create the database schema for hibernate entities by default.
You can also load data related to these entities using src/main/resources/data.sql file.
Also, you can specify a different data file using the “spring.datasource.data” property.
<em>spring.datasource.data=c:/test/initial-data.sql</em>Code language: HTML, XML (xml)For Example, You can define a entity like below and spring boot will take care of schema generation.
@Entity
public class UserEntity {
@Id
@GeneratedValue(strategy = GenerationType.<em>IDENTITY</em>)
private Integer id;
private String firstName;
private String lastName;
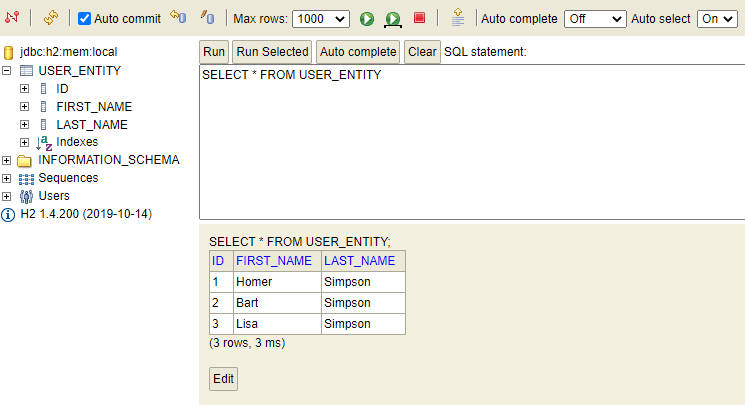
}Code language: PHP (php)As you see in the below screenshot, Spring boot autoconfiguration created the USER_ENTITY table and also loaded three records.
The important thing to note here is that the automatic schema generation is controlled by spring.datasource.initialization-mode property. By default, it is set to embedded. So spring boot will always initialize JPA schema. If you want to disable it, then you need to set it to never.
Also, the schema generation is part of JPA starter. If you are are using spring-boot-starter-jdbc, then you should create a schema.sql to build your database tables.
H2 Console
H2 Console is a web UI for managing the in-memory database. To enabled this UI, first you need to add the following property to your application.properties.
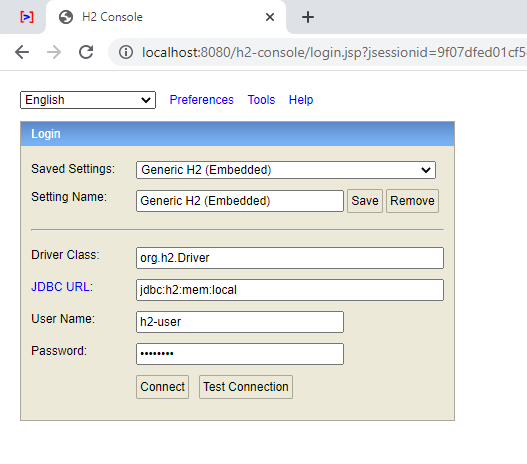
spring.h2.console.enabled=trueCode language: JavaScript (javascript)Once done, you can open http://localhost:8080/h2-console/ for accessing the UI. To log in, you need a db URL, username and password. Here, We know that the username is SA and the password is an empty string by default. But the DB name itself is an auto-generated one. For this reason, you should always provide the values mentioned in the H2 configuration section.
You can configure this screen to some extent. For example, you can change the h2-console URL using spring.h2.console.path configuration. You can even set up an admin password using spring.h2.console.settings.web-admin-password configuration.
Conclusion
Hope you learned about h2 database and how to use and configure them along with Spring Boot. If you want to, You can checkout the examples in this github repository.
You can also learn more about other embedded databases like Apache derby with Spring Boot.
Read further about,