Spring Boot Hazelcast Cache – Guide
This is a complete guide for using Hazelcast as cache backend in your spring boot application with an example.
What is Hazelcast?
Hazelcast (Hazelcast-IMDG) is an in-memory data grid. The ideal use-case for Hazelcast-IMDG would be store and replicate cached content between applications. The grid itself is a collection of embedded instances of Hazelcast runtime. Many of these instances automatically join together to form the grid.
The Hazelcast nodes have in two ways of deployment, and they are,
- The Embedded mode where each application contains a hazelcast node and a client library to read and write data.
- Client-server mode where a cluster of IMDG nodes setup and all application contains a client library to access this cluster.
In embedded mode, the IMDG member is attached to the application. This way, the applications get to access the data immediately without any network round-trip. The below image explains how it works.
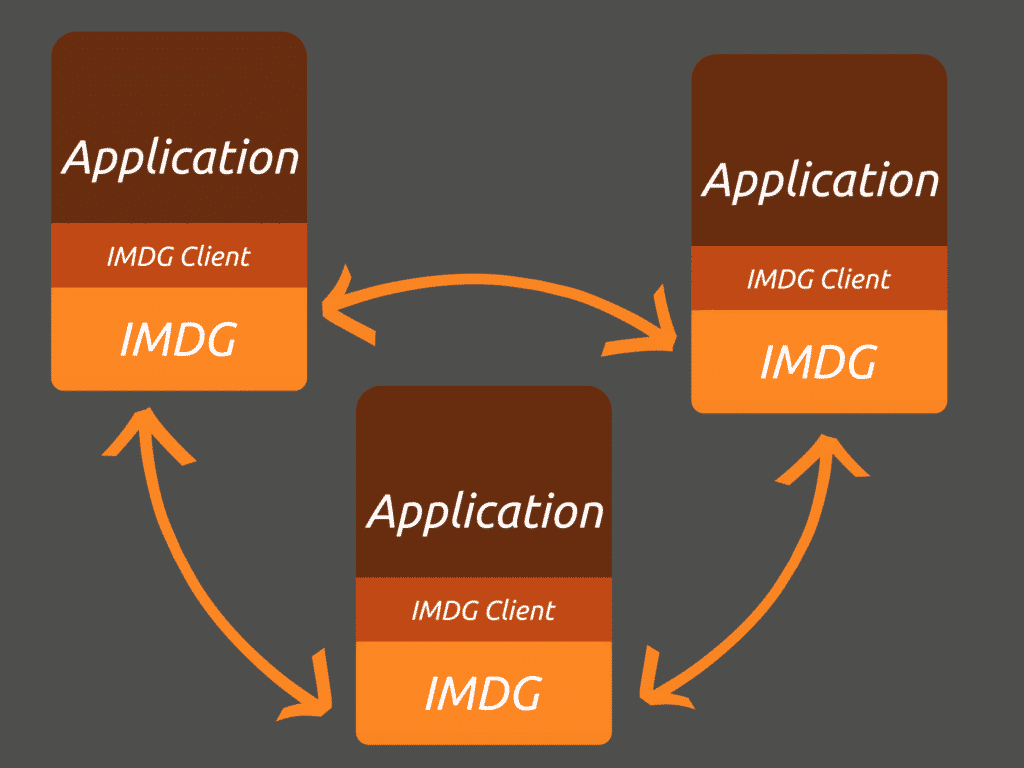
To explain, each application contains a node of the grid, and they can communicate with other nodes to share the data on a grid. That is, Each of the nodes will contain a part of the cached entries. When required, they can confer with each other to look up the appropriate values from the cache.
Thanks to this behaviour we can make it to implement distributed caching or even session replication.
Hazelcast Spring Boot dependencies
The @EnableCaching annotation adds caching support to a spring boot application. But this implementation uses an in-memory ConcurrentHashMap as it’s session store. To enable Hazelcast embedded support to spring boot applications, all you have to do is to add the following dependencies.
<dependency>
    <groupId>com.hazelcast</groupId>
    <artifactId>hazelcast-all</artifactId>
    <version>4.1.1</version>
</dependency>Code language: HTML, XML (xml)
After this, you need to add a hazelcast.yaml to configure the embedded Hazelcast instances. This configuration file needs to go under the src/main/resources/ directory. Here is a simple example of this file.
hazelcast:
  network:
    join:
      multicast:
        enabled: <strong>true</strong>Code language: HTML, XML (xml)
With all the above in place, let’s write our service with @Cacheable annotation. To know more about caching, read about Understanding Spring Boot Caching with an example.
Here is my ItemService class with cache implementation example.
@Service
public class ItemService {
    private static final Logger logger = LoggerFactory.getLogger(ItemService.class);
    private final ItemRepository itemRepository;

    public ItemService(ItemRepository itemRepository) {
        this.itemRepository = itemRepository;
    }

    public List<Item> items() {
        return itemRepository.findAll();
    }

    @Cacheable(value = "items", key = "#id")
    public Item getItem(Integer id) {
        try {
            Thread.sleep(5000);
        } catch (InterruptedException e) {
            e.printStackTrace();
        }
        Item item = itemRepository.findById(id).orElseThrow(RuntimeException::new);
        logger.info("Loading data from DB {}", item);
        return item;
    }

    public Item createItem(Item item) {
        return itemRepository.save(item);
    }

    @CacheEvict(value = "items", key = "#id")
    public Item updateItem(Integer id, Item request) {
        Item item = getItem(id);
        item.setPrice(request.getPrice());
        item.setProductName(request.getProductName());
        return itemRepository.save(item);
    }
}Code language: JavaScript (javascript)
If you look at the getItem method, you can notice that there is a deliberate 5 seconds delay using Thread.sleep(). This way, we will know the result comes from cache or from the method itself. If you want to learn more about spring boot cache abstraction, I would advise you to read about posts listed under caching.
Let’s write a controller method that would make use of the above service.
@GetMapping("/{id}")
public Item getItem(@PathVariable Integer id){
    return itemService.getItem(id);
}Code language: CSS (css)
To demonstrate the distributed caching properties of Hazelcast, let’s start our application over three different ports.
$ java -jar spring-boot-hazelcast-demo.jar --server.port=8081
$ java -jar spring-boot-hazelcast-demo.jar --server.port=8082
$ java -jar spring-boot-hazelcast-demo.jar --server.port=8083
After doing this, in the logs, you will see something like the following. This means that the nodes are forming a data-grid.
Members {size:3, ver:5} [
        Member [192.168.0.15]:5702 - 0b74496d-8dbc-4e6d-812f-55c44301e4e7
        Member [192.168.0.15]:5703 - 80c08934-9135-4f19-92ea-248572aa48e1
        Member [192.168.0.15]:5704 - 491379b6-f138-4661-8148-025c2a077dc4 this
]Code language: JavaScript (javascript)
Verify Cache implementation
The next step is to verify the caching. So let’s hit the /items/1 API. To check the duration taken for the API request, I’m calling curl with the time command. At the end of this command, you should be able to see the time curl has taken.
$time curl -i http://localhost:8081/items/1
HTTP/1.1 200
Content-Type: application/json
Transfer-Encoding: chunked
Date: Wed, 06 Jan 2021 17:16:37 GMT

{"id":1,"productName":"Shirt Small","price":28.99}

real    0m 5.22s
user    0m 0.09s
sys     0m 0.07sCode language: PHP (php)
As you see, the curl command took 5.22 seconds to complete the request. Now let’s hit the same API on a different server (port 8082).
$time curl -i http://localhost:8082/items/1
HTTP/1.1 200
Content-Type: application/json
Transfer-Encoding: chunked
Date: Wed, 06 Jan 2021 17:17:27 GMT

{"id":1,"productName":"Shirt Small","price":28.99}

real    0m 0.25s
user    0m 0.09s
sys     0m 0.07sCode language: PHP (php)
As we had expected, the call only took 0.25 seconds. This ensures that the cache created on the application running on port 8081 has flown down to the application running on port 8082. Until we clear the cached values, all three applications will serve from the cache.
Hazelcast Management centre
You can view the hazelcast performance details via Hazelcast management centre application. To configure this, you first need to download the application from their Official website.
Once downloaded and unzipped, run the bin/start.sh file (or bin/start.bat in Windows).
By default, The application starts at port 8080. To change this to a different port say 8070, set
JAVA_OPTS="-Dhazelcast.mc.http.port=8888"
Alternatively, you can run the application using the docker image.
docker run --rm -m 512m -p 8080:8080 hazelcast/management-centerAfter this, open http://localhost:8070/ to access the management centre app. Select dev mode for local and create a new cluster.
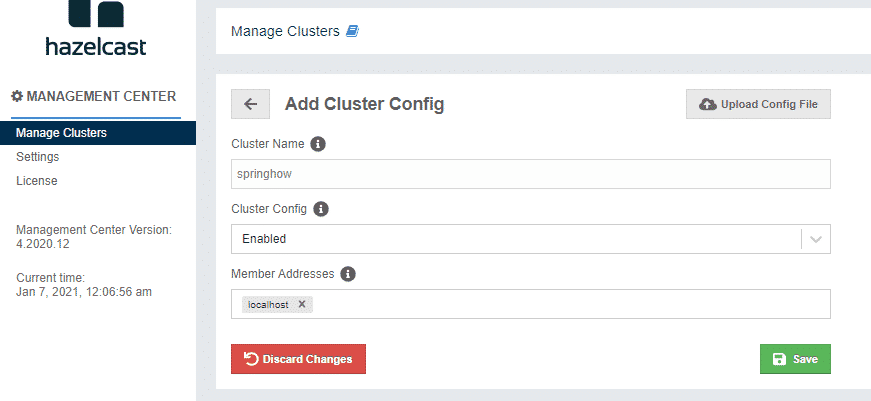
In the cluster config, give a cluster name and set cluster config as enabled and member addresses as localhost. Here you can give each application’s IMDG port say localhost:5701, localhost:5702 etc. However, we would like any new application to be automatically onboarded to the cluster hence I provided localhost. You may want to provide the exact IP/port that you have configured in your production servers.
Once the above is done, Point the application to the management centre by changing the hazelcast.yaml. Note that the cluster name should match the config you provided at the management centre.
hazelcast:
cluster-name: springhow
management-center:
enabled: <strong>true</strong>
url: 'http://localhost:8080/'
network:
join:
multicast:
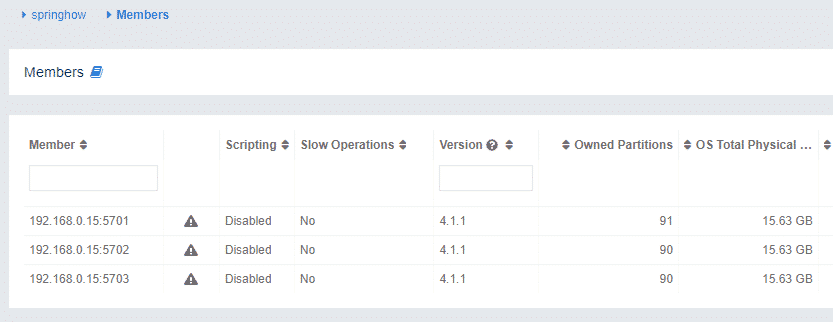
enabled: <strong>true</strong>Code language: JavaScript (javascript)If all of this is set up correctly, the members will become visible in the management centre at the application startup. On the side nav, you can see the members of the cluster.
At the storage section, you can see statistics of cached data under Maps menu.

External config file
Also, You can pass the config file from external locations.
- You can specify the Hazelcast config via
-Dhazelcast-config=/path/to/configJVM parameter at the application startup. - You can place the
hazelcast.yamlunder the current directory where the application starts.
Check out the sample project in this repository for a working sample. Also if you liked this post, you may like the following entries about caching.